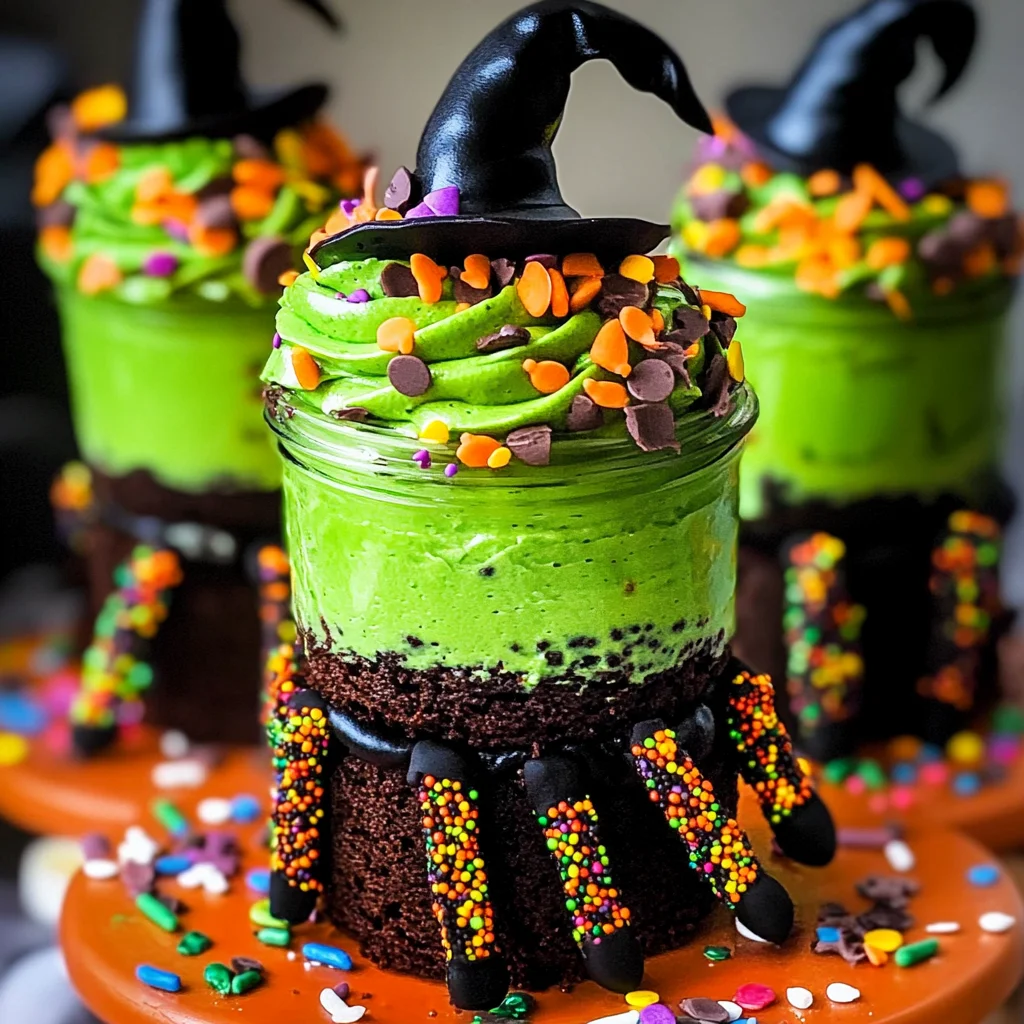
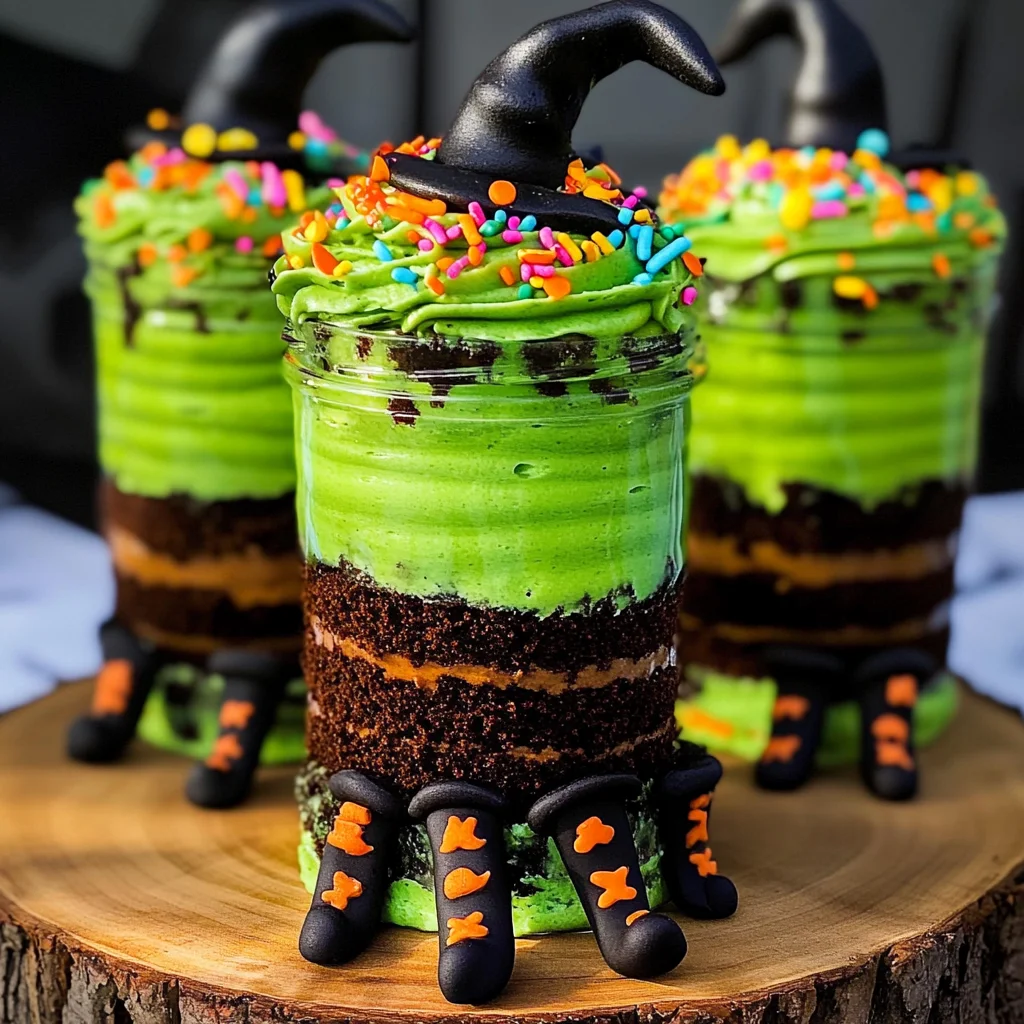
Witches Brew Halloween Cake Jars
Get ready for Halloween fun with these Witches Brew Halloween Cake Jars! Perfect for parties, these adorable jars are filled with layers of rich chocolate cake and vibrant green buttercream. Topped with playful fondant witch legs, they make a spooky yet delightful treat. These cake jars are versatile enough for any Halloween gathering, whether it’s a family celebration or a festive get-together with friends.
Why You’ll Love This Recipe
- Visually Stunning: The combination of chocolate and electric green buttercream makes these jars eye-catching and perfect for Halloween.
- Easy to Assemble: Layering cake and frosting in jars simplifies the process, making it fun and not too messy.
- Customizable Flavors: Feel free to experiment with different colors and flavors to suit your taste or theme.
- Ideal for Serving: Individual jars make portion control easy, allowing guests to enjoy their treats without the need for slicing.
- Perfect for Gifting: These jars can be beautifully packaged as personalized Halloween gifts, adding a special touch to your celebrations.
Tools and Preparation
To create your Witches Brew Halloween Cake Jars, you’ll need some essential tools to ensure success. Having the right equipment can streamline the baking process and help you achieve great results.
Essential Tools and Equipment
- Mixing bowls
- Electric mixer
- Measuring cups and spoons
- Spatula
- Jar containers (for serving)
- Baking pans
Importance of Each Tool
- Electric mixer: A must for achieving fluffy buttercream that spreads easily without lumps.
- Mixing bowls: Essential for combining ingredients efficiently while keeping your workspace organized.
- Spatula: Helps in spreading frosting evenly on the cake layers, ensuring a professional-looking finish.
Ingredients
Get ready to gather your ingredients for these Witches Brew Halloween Cake Jars. Here’s what you’ll need:
For the Cake
- 330 g self raising flour
- 360 g granulated sugar
- 360 g butter
- 6 eggs
- 30 g unsweetened black cocoa powder
- 1½ tsp baking powder
- ½ tsp salt
- 90 ml milk
- 2 tsp vanilla extract
For the Buttercream Frosting
- 400 g butter (salted)
- 800 g powdered sugar (icing sugar)
- 1¼ tsp vanilla extract
- 2 tbsp milk or cream (optional – if the buttercream is too stiff)
- Electric green food coloring (a few drops)
For Decoration
- 250 g Orange fondant
- 200 g Black fondant
- 1 tbsp CMC powder
- Sprinkles
How to Make Witches Brew Halloween Cake Jars
Step 1: Preheat the Oven
Preheat your oven to 350°F (175°C). Grease and line your baking pans.
Step 2: Prepare the Cake Batter
- In a large mixing bowl, cream together the butter and granulated sugar until light and fluffy.
- Add in the eggs one at a time, beating well after each addition.
- Sift together the self-raising flour, unsweetened black cocoa powder, baking powder, and salt in a separate bowl.
- Gradually add this dry mixture to the wet ingredients, alternating with milk and vanilla extract. Mix until just combined.
Step 3: Bake the Cakes
Pour the batter into prepared baking pans. Bake in preheated oven for about 50 minutes or until a toothpick inserted comes out clean. Allow cooling completely before assembling.
Step 4: Make Buttercream Frosting
- In another bowl, beat the salted butter until creamy.
- Gradually add powdered sugar while mixing on low speed.
- Add vanilla extract and milk or cream if needed. Mix until smooth and fluffy.
- Add electric green food coloring gradually until desired color is achieved.
Step 5: Assemble Your Cake Jars
- Crumble cooled chocolate cakes into pieces.
- Layer crumbled cake with green buttercream in jar containers as desired.
- Finish by decorating with fondant witch legs and sprinkles on top.
Enjoy your delightful Witches Brew Halloween Cake Jars!
How to Serve Witches Brew Halloween Cake Jars
Serving Witches Brew Halloween Cake Jars is all about presentation and fun. These delightful jars can add a spooky flair to any Halloween gathering, making them the perfect treat for both kids and adults.
Creative Serving Suggestions
- Layered Display: Stack the jars in a tiered dessert stand to create an eye-catching centerpiece.
- Spooky Labels: Use themed labels on each jar with fun names like Witch’s Delight or Potion of Sweetness.
- Personalized Toppers: Add unique toppers, such as miniature broomsticks or witch hats, for an extra festive touch.
- Themed Table Settings: Coordinate your table decor with Halloween-themed plates, napkins, and utensils.
- Glow-in-the-Dark Elements: Include glow sticks around the jars for a magical nighttime effect that enhances the Halloween vibe.
How to Perfect Witches Brew Halloween Cake Jars
Perfecting your Witches Brew Halloween Cake Jars is easy with a few helpful tips. These will ensure your cake jars are not only delicious but also visually appealing.
- Use Room Temperature Ingredients: Ensure butter and eggs are at room temperature for smoother mixing and better texture.
- Level Your Flour: When measuring flour, use a spoon to fill the cup and level it off for accurate measurements.
- Adjust Buttercream Consistency: If your buttercream is too stiff, add a small amount of milk or cream until you reach your desired consistency.
- Color Gradation: For a more vibrant look, mix different shades of green food coloring into separate batches of buttercream.
- Chill Before Serving: Refrigerate the assembled jars for at least 30 minutes before serving to allow flavors to meld and the cake to set.
Best Side Dishes for Witches Brew Halloween Cake Jars
Complementing your Witches Brew Halloween Cake Jars with fun side dishes can enhance the festive atmosphere. Here are some great options that pair well without overshadowing the sweet treats.
- Pumpkin Soup: A creamy pumpkin soup spiced with cinnamon and nutmeg offers a warm contrast to the sweetness of cake jars.
- Stuffed Peppers: Colorful bell peppers filled with rice, beans, and veggies make a hearty side that balances out sugary desserts.
- Deviled Eyeballs: Classic deviled eggs decorated with olives create a spooky appearance while being easy to prepare.
- Witch’s Fingers Breadsticks: Breadsticks shaped like witch fingers with almond slivers as nails provide a fun finger food option.
- Ghostly Fruit Salad: A mix of seasonal fruits cut into ghost shapes using cookie cutters adds freshness to your dessert table.
- Cheesy Cauldron Dip: A creamy cheese dip served in a small cauldron with tortilla chips creates a playful snack that guests will love.
- Black Bean Salad: A zesty black bean salad topped with avocado adds color and nutrition without overwhelming flavors.
- Caramelized Pumpkin Wedges: Sweet caramelized pumpkin wedges offer a delightful autumn flavor that pairs well with chocolate cake.
Common Mistakes to Avoid
When making Witches Brew Halloween Cake Jars, it’s easy to make some common mistakes. Here are a few to keep in mind:
- Ignoring ingredient temperature: Using cold butter or eggs can lead to uneven mixing and texture. Always bring them to room temperature for a smoother batter.
- Overmixing the batter: Mixing too much can result in dense cakes. Mix just until combined for a light and fluffy texture.
- Not measuring ingredients accurately: Baking is a science, and improper measurements can ruin your cake jars. Use a kitchen scale for precision.
- Skipping the cooling step: Filling jars with warm cake can lead to sogginess. Allow your cakes to cool completely before layering in jars.
- Neglecting flavor variations: Sticking only to chocolate cake may limit creativity. Experiment with different flavors like vanilla or spice for unique treats.
Storage & Reheating Instructions
Refrigerator Storage
- Store Witches Brew Halloween Cake Jars in an airtight container.
- They will last up to 5 days in the refrigerator.
Freezing Witches Brew Halloween Cake Jars
- Freeze jars without frosting for best results.
- Wrap in plastic wrap and place in an airtight container; they will last up to 3 months.
Reheating Witches Brew Halloween Cake Jars
- Oven: Preheat to 350°F (175°C) and heat jars for about 10-15 minutes until warmed through.
- Microwave: Heat individual jars on medium power for about 20-30 seconds; check frequently.
- Stovetop: Use a double boiler method by placing the jar over simmering water, heating gently.
Frequently Asked Questions
What are Witches Brew Halloween Cake Jars?
Witches Brew Halloween Cake Jars are delightful desserts featuring layers of chocolate cake and vibrant green buttercream, perfect for Halloween festivities.
How can I customize my Witches Brew Halloween Cake Jars?
You can customize these jars by using different cake flavors, fillings, or color schemes to match your Halloween theme!
Can I make these cake jars ahead of time?
Yes! You can prepare the cake layers and buttercream ahead of time, storing them separately until ready to assemble.
What sprinkles work best for Witches Brew Halloween Cake Jars?
Look for Halloween-themed sprinkles like bats, ghosts, or orange and black mixes to enhance the festive look.
How should I store leftover Witches Brew Halloween Cake Jars?
Store any leftovers in an airtight container in the refrigerator for up to five days to maintain freshness.
Final Thoughts
Witches Brew Halloween Cake Jars are not only visually stunning but also deliciously versatile. They allow you to get creative with flavors and decorations, making them perfect for any spooky celebration. Try them out and customize them according to your preferences!
Witches Brew Halloween Cake Jars
Get ready to impress your guests this Halloween with Witches Brew Halloween Cake Jars! These playful desserts are a feast for the eyes and the taste buds, featuring layers of rich chocolate cake paired with vibrant green buttercream. Topped with whimsical fondant witch legs, they’re not just treats; they’re festive decorations that add to the spooky ambiance of any celebration. Perfectly portioned in individual jars, these delightful desserts make serving easy and fun, allowing everyone to enjoy a sweet scoop without the mess. Whether you’re hosting a family gathering or a spirited party with friends, these cake jars are sure to be a hit among both kids and adults.
- Prep Time: 30 minutes
- Cook Time: 50 minutes
- Total Time: 1 hour 20 minutes
- Yield: Approximately 12 jars 1x
- Category: Dessert
- Method: Baking
- Cuisine: American
Ingredients
- 330g self-raising flour
- 360g granulated sugar
- 360g butter
- 6 eggs
- 30g unsweetened black cocoa powder
- 1½ tsp baking powder
- ½ tsp salt
- 90ml milk
- 2 tsp vanilla extract
- 400g butter (for frosting)
- 800g powdered sugar
- 1¼ tsp vanilla extract
- 2 tbsp milk (optional)
- Electric green food coloring
- 250g orange fondant
- 200g black fondant
- 1 tbsp CMC powder
- Sprinkles
Instructions
- Preheat the oven to 350°F (175°C). Grease and line baking pans.
- Cream butter and sugar until fluffy. Add eggs one at a time, mixing well after each.
- In another bowl, sift flour, cocoa powder, baking powder, and salt. Gradually combine with wet ingredients, alternating with milk and vanilla until just mixed.
- Pour batter into prepared pans and bake for about 50 minutes or until a toothpick comes out clean. Cool completely.
- Beat softened butter for frosting and gradually add powdered sugar. Mix in vanilla extract and adjust consistency with milk if necessary. Add green food coloring to desired shade.
- Crumble cooled cakes into jars, layering with frosting as desired. Decorate with fondant witch legs and sprinkles.
Nutrition
- Serving Size: 1 jar (120g)
- Calories: 550
- Sugar: 65g
- Sodium: 150mg
- Fat: 29g
- Saturated Fat: 17g
- Unsaturated Fat: 10g
- Trans Fat: 0g
- Carbohydrates: 63g
- Fiber: 2g
- Protein: 6g
- Cholesterol: 115mg