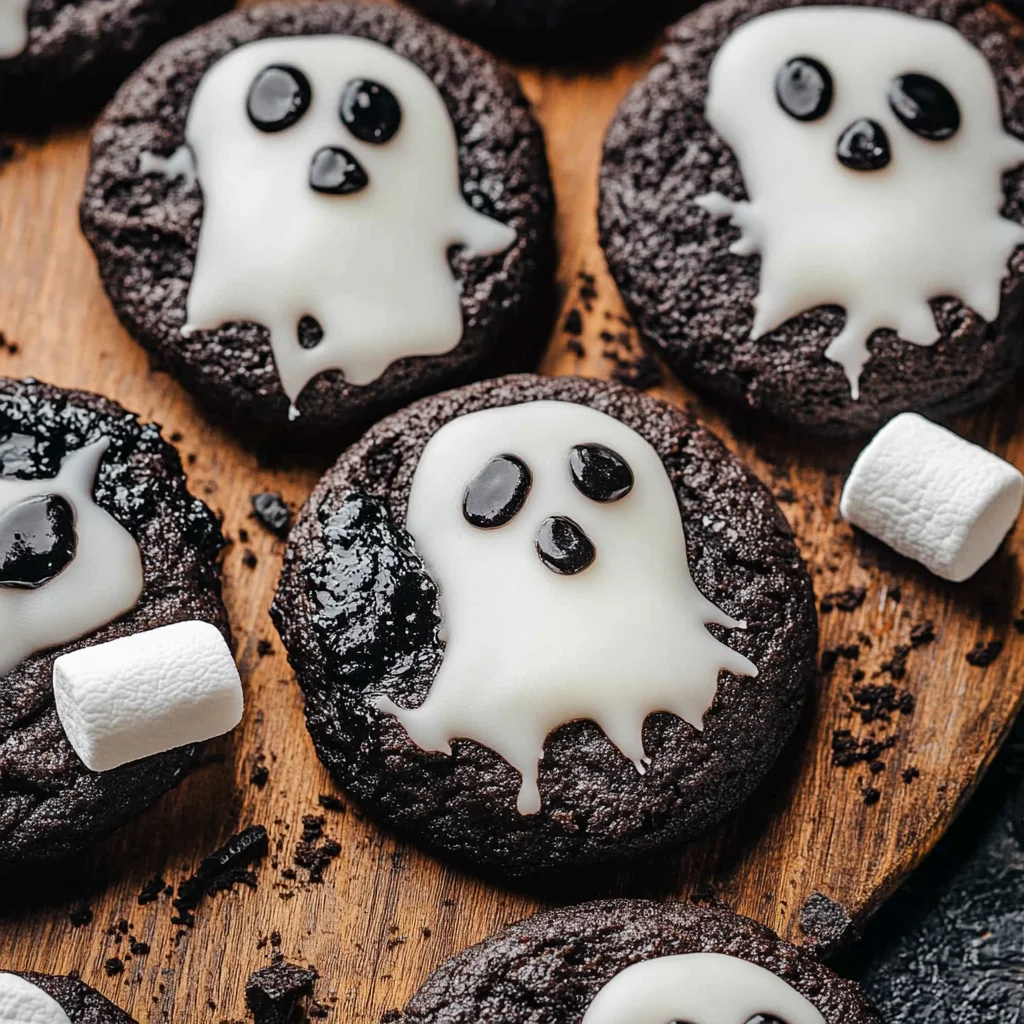
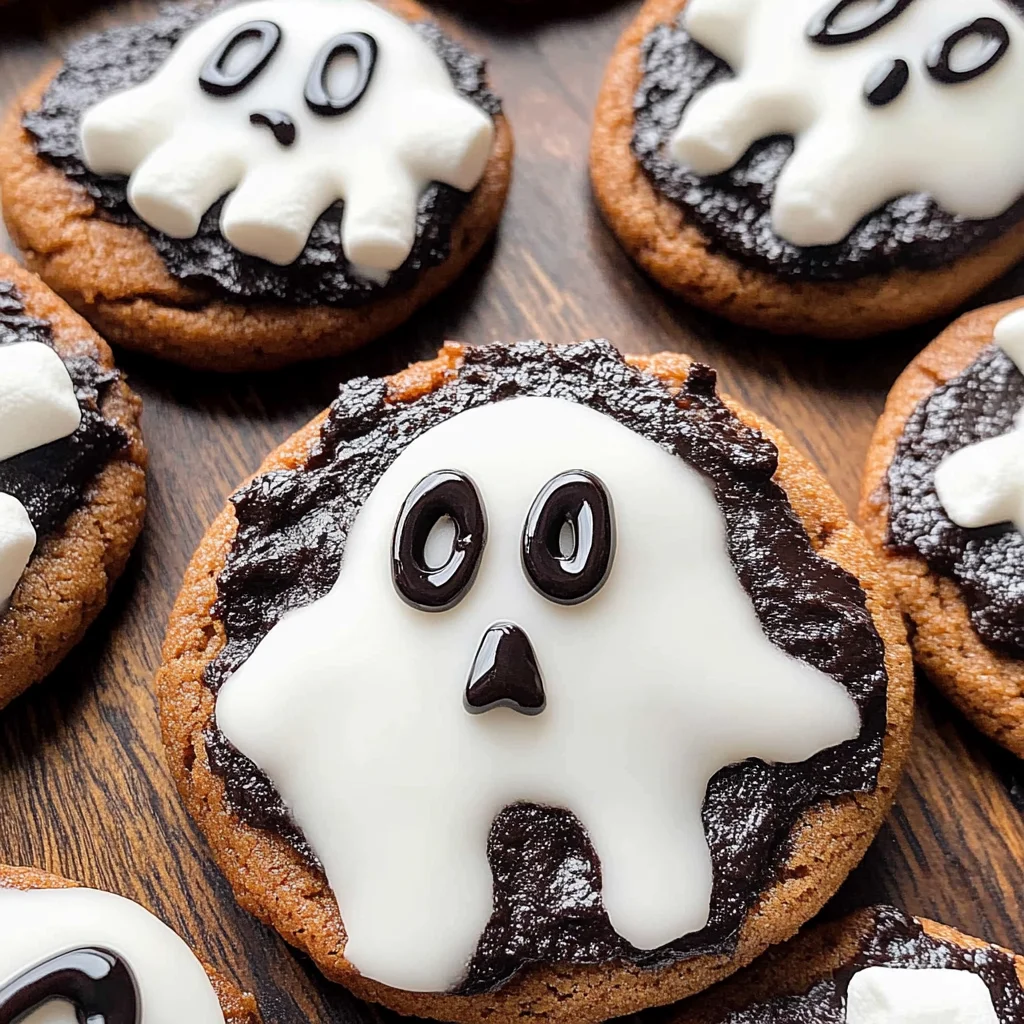
Ghost cookies
Ghost cookies are a fun and easy way to celebrate Halloween. These spooky treats are perfect for parties, gatherings, or just for enjoying at home with family. With their adorable ghostly appearance and simple ingredients, they’ll surely be a hit among kids and adults alike. Plus, they can be made in no time, making them an ideal choice for last-minute baking.
Why You’ll Love This Recipe
- Quick to Prepare: With only 25 minutes of prep time, you’ll have these delicious ghost cookies ready in no time.
- Fun for All Ages: Kids will love helping to decorate these playful treats, making it a great family activity.
- Versatile Decoration: Use black writing icing to create your own designs, allowing for creativity in every batch.
- Perfect for Any Occasion: Not just for Halloween, these cookies can add a festive touch to any celebration.
- Sweet and Chewy Delight: The combination of chocolate chunk cookies and marshmallows offers a delightful texture and flavor.
Tools and Preparation
To create your ghost cookies, you’ll need some essential tools that will make the process smooth and enjoyable. Having the right equipment can elevate your baking experience.
Essential Tools and Equipment
- Baking sheet
- Parchment paper
- Mixing bowl
- Spatula
- Measuring scales
Importance of Each Tool
- Baking sheet: A sturdy baking sheet ensures even cooking and prevents sticking.
- Parchment paper: This makes cleanup a breeze while providing a non-stick surface for the cookies.
- Mixing bowl: A good mixing bowl is crucial for combining ingredients evenly.
- Spatula: Perfect for spreading icing and transferring cookies without breaking them.
Ingredients
Take a pack of cookies and turn them into these spooky Halloween treats.
For the Ghost Cookies
- 175g icing sugar
- 1 x 200g pack chocolate chunk cookies
- 9 vegan marshmallows (regular size)
- black writing icing
How to Make Ghost cookies
Step 1: Prepare Your Workspace
Start by preheating your oven if needed and lining your baking sheet with parchment paper to prevent sticking.
Step 2: Decorate the Cookies
- Take each chocolate chunk cookie and place it on the prepared baking sheet.
- Use a spatula to spread a generous layer of icing sugar over each cookie.
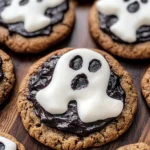
- Cut vegan marshmallows in half horizontally. Place one half on top of each cookie as the ghost’s head.
Step 3: Add Ghostly Features
- Using black writing icing, draw eyes and mouths on each marshmallow half to give your ghosts personality.
- Let the decorated cookies sit until the icing has set slightly before serving or storing.
Enjoy your delicious ghost cookies at your next gathering or as a spooky treat during Halloween!
How to Serve Ghost cookies
Ghost cookies are perfect for any Halloween gathering, adding a fun and spooky touch to your dessert table. Here are some creative serving suggestions to make your ghostly treats the highlight of the occasion.
On a Festive Platter
- Arrange ghost cookies on a colorful platter adorned with Halloween decorations for an eye-catching display.
With Milk or Plant-Based Alternatives
- Serve these cookies alongside cold milk or your favorite plant-based milk for a delightful pairing that complements their sweetness.
As Party Favors
- Individually wrap ghost cookies in transparent bags tied with orange or black ribbons to create charming party favors for guests.
With a Side of Fruit
- Pair the cookies with fresh fruit like strawberries or orange slices to add a refreshing contrast and balance out the sweetness.
In a Dessert Bar
- Set up a dessert bar featuring ghost cookies alongside other spooky treats, allowing guests to mix and match their favorites.
How to Perfect Ghost cookies
To ensure your ghost cookies turn out perfectly every time, keep these helpful tips in mind.
- Use Fresh Ingredients: Always use fresh icing sugar and high-quality chocolate chunk cookies for the best flavor and texture.
- Melt Marshmallows Carefully: When melting marshmallows, do it over low heat to prevent burning and achieve a smooth consistency.
- Customize Icing Designs: Get creative with the black writing icing; you can make different expressions on each ghost for added fun.
- Let Cookies Cool Completely: Allow your cookies to cool completely before decorating them to ensure that the icing sets properly.
- Store Properly: Keep any leftover ghost cookies in an airtight container at room temperature to maintain their freshness.
Best Side Dishes for Ghost cookies
Ghost cookies pair well with various side dishes that enhance their festive appeal. Consider these options when planning your Halloween gathering.
-
Pumpkin Spice Muffins
Add seasonal flavor with moist pumpkin spice muffins that complement the sweetness of ghost cookies. -
Chocolate-Covered Pretzels
The salty crunch of chocolate-covered pretzels creates a delightful contrast when served alongside sweet ghost cookies. -
Caramel Apples
A classic fall treat, caramel apples provide a chewy and sweet texture that pairs well with soft ghost cookies. -
Spooky Fruit Salad
Mix seasonal fruits like apples, oranges, and grapes into a colorful salad topped with spooky sprinkles for a festive twist. -
Halloween-Themed Cheese Board
Create a cheese board featuring cheeses shaped like pumpkins or ghosts, offering savory bites alongside sweet treats. -
Cinnamon Sugar Tortilla Chips
Serve warm cinnamon sugar tortilla chips for dipping in chocolate sauce or salsas as an exciting addition to your dessert spread.
Common Mistakes to Avoid
Baking ghost cookies can be a fun experience, but there are common pitfalls to watch out for. Here are some mistakes to avoid:
- Using stale cookies: Always ensure your chocolate chunk cookies are fresh. Stale cookies won’t hold the icing well and can affect the taste of your ghost treats.
- Overheating the icing: If you need to melt icing, do it slowly. Overheating can change its texture, making it difficult to spread or pipe onto your cookies.
- Inadequate cooling time: If you rush decorating, the icing might slide off the cookies. Let them cool completely before adding any decorations.
- Ignoring measurements: Baking is precise. Measure your icing sugar accurately for the best consistency and sweetness in your ghost cookies.
- Skipping decorations: The fun of ghost cookies is in their spooky look! Don’t be afraid to get creative with your black writing icing for facial features.
Storage & Reheating Instructions
Refrigerator Storage
- Store ghost cookies in an airtight container for up to 5 days.
- Place parchment paper between layers to prevent sticking.
Freezing Ghost cookies
- Freeze for up to 3 months in a freezer-safe container.
- Wrap each cookie individually in plastic wrap before placing them in a container.
Reheating Ghost cookies
- Oven: Preheat to 350°F (175°C) and heat for about 5 minutes until warm.
- Microwave: Heat one cookie at a time for about 10-15 seconds on medium power.
- Stovetop: Place in a non-stick skillet over low heat for about 1-2 minutes, flipping gently.
Frequently Asked Questions
Here are some common questions about ghost cookies that can help enhance your baking experience.
How do I make my ghost cookies extra spooky?
You can add more decorations using different colors of icing or edible glitter for an even spookier effect on your ghost cookies.
Can I substitute ingredients in the ghost cookies recipe?
Yes! You can use gluten-free chocolate chunk cookies and alternative sugars if needed while keeping the base recipe intact.
How can I customize my ghost cookie designs?
Feel free to experiment with different shapes or toppings! Use colored sprinkles or other candies to create unique designs on your ghost cookies.
What should I do if my icing is too runny?
If your icing seems runny, add more icing sugar gradually until you achieve a thicker consistency suitable for decorating your ghost cookies.
Final Thoughts
These ghost cookies are not only delicious but also an exciting treat perfect for Halloween gatherings. Their versatility allows you to customize them with various designs and flavors, making them a fun project for bakers of all ages. Try making these spooky delights today!
Ghost Cookies
Get ready to delight your friends and family with these playful Ghost Cookies, the perfect treat for Halloween! These spooky snacks are not only visually appealing but also incredibly easy to make, making them an ideal choice for festive gatherings or last-minute baking. With a combination of soft chocolate chunk cookies topped with fluffy vegan marshmallows and creative decorations, these cookies provide a deliciously sweet experience for kids and adults alike. Plus, they can be customized with different icing designs, allowing you to unleash your creativity in the kitchen. Enjoy making and sharing these whimsical ghostly treats at your next Halloween celebration!
- Prep Time: 25 minutes
- Cook Time: 0 minutes
- Total Time: 25 minutes
- Yield: Makes approximately 9 ghost cookies 1x
- Category: Dessert
- Method: Baking
- Cuisine: American
Ingredients
- 175g icing sugar
- 1 x 200g pack chocolate chunk cookies
- 9 vegan marshmallows (regular size)
- Black writing icing
Instructions
- Preheat your oven if necessary and line a baking sheet with parchment paper.
- Place each chocolate chunk cookie onto the prepared baking sheet.
- Spread a generous layer of icing sugar over each cookie using a spatula.
- Cut the vegan marshmallows in half horizontally and place one half on top of each cookie as the ghost's head.
- Use black writing icing to draw eyes and mouths on the marshmallow halves.
- Let the decorated cookies sit until the icing sets slightly before serving.
Nutrition
- Serving Size: 1 cookie
- Calories: 160
- Sugar: 22g
- Sodium: 65mg
- Fat: 6g
- Saturated Fat: 2g
- Unsaturated Fat: 4g
- Trans Fat: 0g
- Carbohydrates: 25g
- Fiber: 0g
- Protein: 1g
- Cholesterol: 0mg